LG vacuum cleaner VC3016GHTQY Manual
Contents
1. IR b SR HUZHAE AE UR Z1 Val TF SN SS ge Ce ens e Em CRM 9 RE 9 o o HEI TRIERA eth BAAN WARE ORR e DB we HOP em e BITE BATAS F BOGRES Sd ate e XA BOUE EMUANEA A PB IRIS ASAE RIRH ES fi FH RE DA 5 l b2. O LENS ETE HB TTX HOWL KIEA gt P l o E CE BB EU RIED RIEA A A MAX MAX BERE 13 86 4 48 TK GDS LER ANAE A A EJ nant O
3. 15A 6A VEU 8
4. e a BE iur S A e e x Oo 7 Kk Fr EN F AX et igi Er BITE AE 8 1A P UREKEFP RARER BARUKERERE BSS RRSP OMKEBRR Mea b 220V MESSIS celi 9 2 es Zo p o te Ns
5. Werder im I es se e 15 16 RE RIRE Table of contents 17 18 19 Product specifications A
6. fidi SESS ARAKEA B P PRARABARS OAR O MENETE 2 LU BRAKER AA je d FREEZE swe Hy RECREATE oR FRAG FIRE HARER TF E ERAMATE RIEEESISIIEISET HA E EHE A MERE HE MRZDBIS RIA ESOS SEWER T NAIA TTA gt lisse 2 3
7. e 8 H ie H E ai gt w E E gt 38 ah Bk e m um E 10 FAA CRAP EIE as RO e Ent xi 11 Wie as HUIUS EB 7 IE Tri 7 2A gt PARES eS HAS TEMA FART o e
8. g gt RAJS gt BSH et Re 13 14 gt Rees Oo Q MAX CARTII DELETE E Oo O A onum
9. N Is it full Empty the dust tank in time e N Is the filter OK Then check the suction inlet e e When checking the suction inlet adjust the suction level to the maximum If there is still a problem proceed Het Ole If there is still a problem proceed the third step Turn cleaner off and disconnect from electrical outlet then disconnect nozzle from telescopic tube Check if it is blocked and remove any blockages the second step Disconnect the telescopic tube from hose Check if itis blocked and remove any blockages P4 A If there is also a problem clean Plug cleaner in turn on and check hose end for suction Remove any obstructions the filter N 29 If you have a problem Please check before notifying malfunction If you doubt the product meets with malfunction please check the cause of such malfunction before contacting with the after sales service center or agent so as to ensure efficiency of repair Malfunction The vacuum does not work C The vacuum does not work Peculiar smell exists inside the vacuum cleaner KLOD eK The power cord can not be scrolled thoroughly into the vacuum cleaner or the power cord can not be fully pulled The vacuum cleaner or the discharged air is too heat lt Inner wall of the hose is too dirt Check ls the plug inserted Is the s
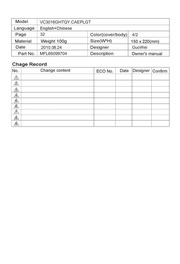
10. Model VC3016GHTQY CAEPLGT Language English Chinese Page 32 Color cover body 4 2 Material Weight 100g Size W H 150 x 220 mm Date 2010 08 24 Designer GuoWei Part No MFL66099704 Description Owner s manual Chage Record No Change content ECO No Date Designer Confirm PP PPP RP BP VC3016GHTQY 1 167 English gt Page 17 31 ic af 400 819 9999 R N BR E RS AULA AE UR JI ELS 6 IR J WIF RB FERS ERNEA K AA E BARNEA TREI Oo w TESSUTI 9 TRE SP BS BE AD EB a TK RLM KEP BBA 10 11 TREE E HETI NERS AIH ERE R RIT A 12 PRED Zo FRR aC BEE IE BTA A A BL 13 HR ED 75 sk 14 15 16 VC3016GHTQY 220V 50Hz
11. Attach the cover by inserting the spiral in the Assemble the dust separator and box cover into the groove Attach the assembled dust box to the body of the cleaner Warning Do not push the button when you carry the vacuum cleaner If push the button it is easy to detach thedust tank from the vacuum cleaner f you use the cleaner without assembling the cover of the dust separator it will increase the noise and reduce the inhaling power when cleaning So check the assembling once again 25 an and assemble the Disassembling Detach the protection filter of the motor from the body after disassembling the dust box Separate it from the filter cover Detach the filter Cleansing Clean with running water Remove the water completely Dry in the well ventilated shade for a day before using Put the filter into Cover the filter Fix the assembled filter Assemble the dust tank the case 26 How to separate clean an exhaust filter Disassembling b The exhaust filter should be cleaned at least once half a year Allow exhaust filter to dry in a shaded location for a dry Cover button of the exhaust filter Exhaust filter button Exhaust filter Cover of the exhaust filter Cleansing Assembling Insert the exhaust filter and join the cover properly until you hear the click of the button The cord winds up when you press the button Insert the spiral of the inhaler into
12. clean floor also can be used corner and small space to clean corner when be puckered cleaning the Sani Punch Using the Sani Punch Using jos the Set the suction power control switch to itt before vacuuming Depending on the type of bedding handing may be awkward or it may cause a lot of noise If this is the case adjust the suction power control switch to a lower setting bed bedding heavy blanket Light blanket amp sheet To increase cleaning efficiency for light blankets lay on top of a bulky blanket and then clean e If the punch bar does not move lift the nozzle slightly off the surface fit does not move even after doing this check if the suction power is too low or if the nozzle base is clogged with a foreign object This Sani Punch nozzle is for effective cleaning of beds and blankets to remove mites and dust Cleaning the Sani Punch gt The vibrator may break down due to the cleansing of the inhaler with water A Spiral If the dust settles in the After the cleaning if Empty the box Aim at the Spiral Fix the box box while cleaning press there are lots of dusts into the inhaler by turning it the button 2 or 3 times in the box separate the clockwise It will remove most of box from the inhaler by the dust turning it anticlockwise Separate the bottom plate Clean the dirty body of the Wash the separated bottom by pressing the buttons in inha
13. the groove in the back or at the bottom of the body S Defore reporting the trouble P You won t be happy to waste money by calling for service when there is no trouble with the cleaner Here is good advice to follow for trouble shooting before calling for service Read the instructions carefully and you can remove the trouble by yourself EO Check if the control button of the inhaling power If inhaling is Stage 1 has been put to MAX not well done Stage2 Clean the protection filter of the motor Uncover the body by pressing Detach the protection filter of the motor the button of the cover from the body after disassembling the dust box Separate the filter from the cover by Detach the protection filter of the motor holding the handle of the case Cleansing with cold water Cleanse it with running water Remove the water completely Dry it in the well ventilated shade for a day before using 28 If you have a probi If you have a problem gt If a minor problem occurs it usually can be solved quite easily when the cause is found by using the check list below Problem Tisi Suction power Help increases and is abruptly Check the dust the hose shrink weakened tank and suction Solution Dust tank full Arrive at MAX line Empty dust tank Motor fitter dirty Clean the motor filter with brush and water allow to dry and replace in cleaner inlet
14. 1400W 1600W 400W 5 0Kg 1 2L 402mmx259mmx275mm GB4706 1 2005 GB4706 7 2004 GB17625 1 2003 GB4343 1 2009 x fi FH BU TE SERIE PATT SORE ST OOS AAU BUERE THE EUR 2 A ze E Er 220V SV SS gt ARNG Q 4 Sp
15. ay immediately cause serious injury or death A WARNING May possibly cause serious injury or death ATTENTION May possibly cause losses of property or light injury AX pancer Do not pick up anything that is burning or smoking such as cigarettes matches or Please turn off the power before pulling out the plug to prevent fire or electric shock Never handle plug or appliance with wet hands Do not use the appliance on the hotashes power above 220V 1 amp gt a e Avoid picking up hard sharp objects with To avoid the danger of fire or electric shock the cleaner They may damage the cleaner do not vacuum liquid blade flammable and the tank substances or small particles like cement Do not vacuum the objects like hair ball or and gesso in cleaning big paper ball otherwise the hose is possibly lt blocked up Please clear the hose in time when it is blocked Independently use a socket when the current Unplug cleaner when not in use Turn off all is 215A It may cause fire when many electric controls before unplugging appliances share one socket In order to avoid the needless danger you had better not use the prolonged thread of power cord The current at most 6A is allowed f P S Attention before using warning Do not let the power cord near the electric heater or other heat source lest that the cleaner should be deformed or it should Do not operate the appliance for l
16. ed inside the machine or it is caused by high temperature in the summer The cord is bended inside the machine or not coiled around the winder After the winder is started the normal operation could be realized The heat air discharged from the machine is arising from the heat produced by motor So the temperature is normal please use the machine continuously Is the suction normal Never suck the water because after mixing of the water and dust the tube wall will be polluted and the motor will be damaged Packing List Packing List Vacuum Cleaner 1 Owner s Manual 1 Upholstery Nozzle 1 Dust Brush 1 Crevice tool 1 Hose 1 Telescopic tube d Corner Nozzle 1 Sani Punch 1 Hard Floor Nozzle 1 Card Service 1 31 jo B I B Ek TT TG p Lass 400 87 9 9999 LG tit AE 9 022 26903476 300402 400 819 9999 Lou http www lg com cn P No MFL66099704
17. ingers feet and all parts of body away from the nozzle or movable portion 19 Flexible Hose Control button Cord winding Button Hard Floor Nozzle gt 8 D Q o D Oo Upholstery Dusting Crevice tool Corner Nozzle Telescopic tube Sani Punch Nozzle Brush Adjusting the Cleaner Use it as shown in the diagram oo cleaning the dirtiest environment 9 th t cleaning fabrics and mattress bedding 2 9 zb cleaning sofa chair floor leaning door and window curtain table 9 bi and light blanket e Adjusting to when you stop operating the appliance When cleaning under different environment adjust the suction level according to practical need 20 Using crevice tool upholst brush corner nozzle and cle Using crevice tool Use it as shown Using method in the diagram j Nozzle Crevice can be used for cleaning the place hard to reach Using Dust Brush amp Upholstery Nozzle P Tear the vinyl bag and pull out accessories Use it as shown in the diagram Using method J Nozzle Crevice can be used for cleaning the place hard to reach Using and cleaning the corner nozzle Assembling Using Cleaning BP Comernozzlecanbe P Corner nozzle makes you Use crevice tool Use calico dishcloth used to clean common more convenient to clean to clean to
18. ler carefully with a cloth plate and dry it in the shade the back Joining spiral Vibrator Joining groove Arrange the vibrator in order Insert the joining spiral into T Attach the bottom plate the groove properly by pressing down 22 Using hard floor no P Hard floor nozzle can be used to BP Hard floor nozzle makes you more clean common floor convenient to clean floor 23 rate or empty the dust box A Warning Empty the box when the dust settles up to the MAX line Too much dust beyond this line may reduce the inhaling power Dust box should be cleaned at least once per 3 months nfi E Detach the dust tank when Uncover the dust tank cover by holding Empty the dust tank press the button its handles How to empty the dust separator Warning Check the inside of the dust separator when cleaning the dust box Clean the inside of the dust separator because too much foreign substance such as waste paper or plastic in the dust separator may reduce the inhaling power Dust separator should be cleaned at least once per 3 months Separate the cover by holding its handle Empty the separator Remove the dust from the small holes cover of the separator 24 How to clean and ass box and separator Cleaning Cleanse the dust box separator and its Dry them in the well ventilated shade for cover with running water a day before using Assembling
19. ocket powered on If the hose inserted Troubleshooting Insert the plug tight This product is applicable for 220V 9 Verify the power of socket is on Insert the hose tight If the motor heat protection Restart in 2 hours opened When the vacuum cleaner s suction is too large or the motor is under high speed running they do not belong to the abnormal conditions So please use the vacuum cleaner properly If it is the noise rather than the normal motor sound please phone the repair center The duster collector is filled up Clean out the dust collector The filter is clogged Purge the sponge filter with water and air dry m 3s in the shady and cool place for one day Suction inlet is jammed B Drawtube is clogded Take out the sucked objects before use EE Take out the objects inside the drawtube Hose is clogged before use Take out the objects inside the hose before use When the motor is running the rubber band used for fixing the motor will produce a little smell due to the heat but it will not affect the operation or damage the machine When the machine sucks some water accidentally or the dust collector is not cleaned for a long period of time the peculiar smell will be produced So clean up the dust collector timely Pull out part of the power cord and then re scroll it Please put forth your strength to pull out the power cord which will not be damaged The power cord entwin
20. ong when the nozzle inlet or nozzle outlet is blocked which may have it deformed or damaged cause fire Do not use the appliance when the power cord or plug is damaged The damaged power cord or plug must be replaced in the approved service station Close supervision is necessary when any appliance is used by or near children Do not allow vacuum cleaner to be used as a toy or to run unattended at any time S A ATTENTION Do not allow the non professional maintenance people to repair Do not pull or carry by cord use cord as a handle close door on cord or pull cord around sharp edges or corners Do not run appliance Over cord Keep cord away from heated surfaces In winding the power cord hold the plug before pressing the button of the cord reel Do not pull the power cord beyond the red warning line other wise the power cord may be damaged or unable to be wound up Pay attention to the plug in winding the cord to avoid damaging the surrounding objects z AFE In using the appliance pay attention to the electrostatic effect generated on the telescopic tube and cleaner body Do not bend stamp on or drag the hose Do not continue to use the hose if it is damaged Do not use any heavy or sharp object to press the power cord Do not use without dust tank or filters in place Change tank frequently when picking up very fine materials such as powder Keep hair loose clothing f
21. ttention before using the appliance 20 Assembling and adjusting the Cleaner Parts description and assembly Accessories Adjusting the cleaner Using crevice tool upholstery nozzle dusting brush corner nozzle 21 and cleaning the corner nozzle 22 Using and cleaning the Sani Punch Using the Sani Punch Cleaning the Sani Punch 23 24 Using hard floor nozzle How to separate or empty the dust box How to empty the dust separator How to clean and assemble the dust box and separator 25 Cleaning Assembling How fo separate clean and assemble the protection filter of the motor 26 Disassembling 27 Cleansing How to separate clean and assemble exhaust filter Disassembling Cleansing Assembling 28 29 30 Check before reporting the trouble If you have a problem Packing List 31 Model VC3016GHTQY 220V 50Hz IEC 1400W MAX 1600W Suction Power 400W Net Weight 5 0Kg Dust Capacity 1 2L Dimension 402mmx259mmx275mm This appliance complies with the following GB Directives GB4706 1 2005 GB4706 7 2004 GB17625 1 2003 GB4343 1 2009 x You will not be informed otherwise of any changes in appearance and standard deriving for improvement of product quality Product specifications 17 18 before using the appliance Attention before using the appliance Please read all the following information which contains important instructions for the safety the use of the appliance A DANGER M
Download Pdf Manuals

Related Search
LG vacuum cleaner VC3016GHTQY Manual lg vacuum cleaner vc3320nntg lg upright vacuum cleaner lg vacuum cleaner customer care lg vacuum cleaner models lg vacuum cleaner battery lg new vacuum cleaner lg wet and dry vacuum cleaner lg automatic vacuum cleaner lg vacuum cleaner amazon lg vacuum cleaner 2000w lg vacuum cleaner vk53181nntm lg electronics vacuum cleaner lg vacuum cleaner review vacuum cleaner lg 1800 watt lg vacuum cleaner service centre lg portable vacuum cleaner lg canister vacuum cleaner lg vacuum cleaner repair lg vacuum total care kit lg lwc3063st owners manual lg vacuum customer service